MeshCentral
===========
For more information, [visit MeshCommander.com/MeshCentral2](http://www.meshcommander.com/meshcentral2).
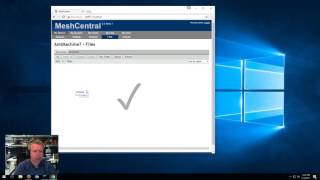
This is a full computer management web site. With MeshCentral, you can run your own web server and it to remotely manage and control computers on a local network or anywhere on the internet. Once you get the server started, will create a mesh (a group of computers) and then download and install a mesh agent on each computer you want to manage. A minute later, the new computer will show up on the web site and you can take control of it, etc. MeshCentral includes full web-based remote desktop, terminal and file management capability.
This version of MeshCentral that is completely rebuild of the original MeshCentral coded in C#. It's simpler and includes many other design improvements over the original. At some point in the future, [MeshCentral.com](http://meshcentral.com) that is still running the older code will switch to using this code base. For now, this is early software, preview quality at best.
Note that in this version, **the Mesh Agent works only on Windows**. This version is BETA and should not be used in production.
Installation
------------
Make sure you have NodeJS and npm installed. If you are behind a proxy, setup npm to use the proxy:
```
npm config set proxy http://proxy.com:88
npm config set https-proxy http://proxy.com:88
```
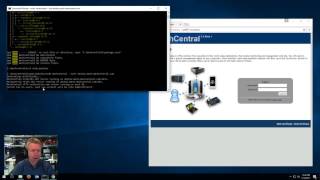
Then, install MeshCentral by creating an empty folder and using npm to download the module:
```
mkdir meshcentral
cd meshcentral
npm install meshcentral
```
To run MeshCentral you may need to use "nodejs" instead of "node" on Linux.
```
cd ./node_modules/meshcentral
node meshcentral [arguments]
```
One of the first things you will want to do is set a server name or IP address. This will be used by mesh agents to connect back to the server. So, make sure you set **a name that will resolve back to your server**. MeshCentral will not register this name for you. You must make sure to setup the DNS name yourself first, or use the right IP address. If you are just taking a quick look at MeshCentral, you can skip this step and do it at later time.
```
node meshcentral --cert servername.domain.com
node meshcentral --cert 1.2.3.4
```
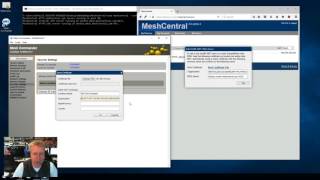
On Windows, you can install MeshCentral to run as a background service, just run it using "--install". Once running, open a browser and enter the server url. By default, a TLS self-signed certificate is created so you will need to ignore the security warning given by your browser. A link to the root certificate you need to load in your browser is provided on the web site if you want to make warnings go away. You can run without TLS security using --notls, but this is not recommended.
Update and uninstall
--------------------
Upgrading or uninstalling MeshCentral is super easy, just use npm as usual. From the parent folder of node_module, enter ether:
```
npm upgrade meshcentral
npm uninstall meshcentral
```
Command Line
------------
Command line arguments on Windows only:
| Arguments | Description
| ------------------------------------- | -----------
| --install | Install MeshCentral as a background service.
| --uninstall | Uninstall MeshCentral background service.
| --start | Start MeshCentral as a background service.
| --stop | Stop MeshCentral background service.
Command line arguments on any platform:
| Arguments | Description
| ------------------------------------- | -----------
| --notls | Use HTTP instead of HTTPS for the main web server.
| --user [username] | Always login as [username] if the account exists.
| --port [number] | Web server port number (default to 443).
| --mpsport [number] | Intel AMT server port number (default to 4433).
| --redirport [number] | Redirection web server, redirects users to the HTTPS server (default to 80).
| --exactports | Server must run with correct ports or exit.
| --cert [name], (country), (org) | Create a web server certificate with a server name. Country and organization can optionaly be set.
Configuration File
------------------
As an alternative to using command line arguments, you can create a ./node-module/meshcentral-data/config.json file, for example:
```json
{
"settings": {
"port": 8080,
"redirport": 81
},
"domains": {
"": {
"title": "MyServer",
"title2": "Servername",
"userQuota": 1048576,
"meshQuota": 248576,
"newAccounts" : 1
},
"Customer1": {
"title": "Customer1",
"title2": "Extra String",
"newAccounts" : 0
},
"Customer2": {
"title": "Customer2",
"title2": "Other String"
}
}
}
```
The "settings" part are for command line arguments. For example, instead of running with "--port 8080", you can put "port: 8080" in the settings portion of the config.json file. In addition, you can use the config.json file to create multi-tenancy servers. In the domains section, you can set options for the default domain ("") in addition to creating new domains.
For the configuration above, the root domain and two other domains will be accessible like this:
```
https://servername:8080/
https://servername:8080/customer1
https://servername:8080/customer2
```
When you setup many domains, the server considers each domain seperatly. Each domain has seperate user accounts, administrators, etc. Within each domain, you can put a "title" and "title2" as strings that will show up at the top of the web site. "userQuota" indicates the default maximum amount of data a user can have in it's "My Files" folder. "meshQuota" is the maximum total size of files in each mesh folder. "newAccounts" indicates if new accounts can be created from the login page, 0 if not allowed, 1 if allowed. Note that if a web site has no accounts, the new account option will be available until an account is created and the first account will be the site administrator.
Other Notes
-----------
For Windows users, if you install MeshCentral globally using "npm install meshcentral -g", it will not be able to run correctly as a Windows Service. It will immidiatly stop each time you start it.
For more information on MeshCentral or other tools, visit [MeshCommander.com](http://meshcommander.com).
Tutorials
---------
How to install MeshCentral2 in a few minutes.
[](http://www.youtube.com/watch?v=LSiWuu71k_U)
Demonstration of MeshCentral2 usages and more tips & tricks.
[](http://www.youtube.com/watch?v=1E3NqGJzYds)
How to setup Intel® AMT client initiated remote access (CIRA) to connect to MeshCentral2.
[](http://www.youtube.com/watch?v=rA2KHa2jkO0)
License
-------
This software is licensed under [Apache 2.0](https://www.apache.org/licenses/LICENSE-2.0).